Difference between revisions of "Setup"
From ArmadeusWiki
(→Packages and Modules) |
(→First StartUp) |
||
| Line 2: | Line 2: | ||
==First StartUp== | ==First StartUp== | ||
| − | Just got your Armadeus board and want to start | + | Just got your Armadeus board and want to start playing with it ? <br> |
Then follow this quick list to setup your environment accordingly: <br> | Then follow this quick list to setup your environment accordingly: <br> | ||
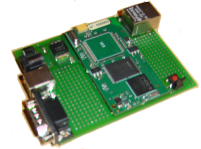
| − | *1. Connect your APF to your custom development board or to | + | *1. Connect your APF to your custom development board or to your DevLight ( This will be further refered to "the Target") --->> [[Image:Apf_on_devlight.png]] <br> |
*2. Connect your PC (= the Host) to your development system with a null-modem RS232 cable <br> | *2. Connect your PC (= the Host) to your development system with a null-modem RS232 cable <br> | ||
| − | *3. | + | *3. Connect the power supply on your system ('''+5Vdc on a Devlight. + is in the middle of the connector, - on the side''') <br> |
*4. [[Communicate | Establish the communication between your Host and your APF]] <br> | *4. [[Communicate | Establish the communication between your Host and your APF]] <br> | ||
*5. Verify your APF by starting Linux: In U-Boot, type "boot". Several informations will be displayed on your console like on this [[Linux start screenshot | screenshot ]] <br> | *5. Verify your APF by starting Linux: In U-Boot, type "boot". Several informations will be displayed on your console like on this [[Linux start screenshot | screenshot ]] <br> | ||
Revision as of 20:57, 4 November 2007
On this page, you will find all the usefull informations you need to configure your Armadeus board for optimum usage.
First StartUp
Just got your Armadeus board and want to start playing with it ?
Then follow this quick list to setup your environment accordingly:
- 1. Connect your APF to your custom development board or to your DevLight ( This will be further refered to "the Target") --->>
- 2. Connect your PC (= the Host) to your development system with a null-modem RS232 cable
- 3. Connect the power supply on your system (+5Vdc on a Devlight. + is in the middle of the connector, - on the side)
- 4. Establish the communication between your Host and your APF
- 5. Verify your APF by starting Linux: In U-Boot, type "boot". Several informations will be displayed on your console like on this screenshot
- 6. If Linux has successfully started, you can proceed with the toolchain installation. See Basics below

Basics
- Toolchain: How to install the development environment for the Armadeus boards
- Communicate: How to communicate with the Armadeus boards from the Host
- Target Software Installation: How to install, uBoot, Linux and your RootFS on the Armadeus boards
Packages and Modules
- FrameBuffer: how to configure and use the framebuffer for new LCDs
- How to control the backlight of you graphical LCD (if it supports it)
- GPIO Driver: how to configure the GPIO driver
- Network Configuration: how to configure Host and Target network (NFS, TFTP)
- Boa: How install and configure the boa Web server on your board
- Serial Transfer: how to transfer files between your Host and your Armadeus board with the RS232 link (if you don't have Ethernet)
- USB Gadget: how to configure your Armadeus board to use it as a USB device (aka Gadget in Linux language)
- MultiMediaCard: how to use MMC/SD cards on Linux with your Armadeus board
- Digital to Analog Convertion: how to configure and use the DAC on your board
- FPGA loader: how to upload a new firmware from Linux
- Analog to Digital Converter: how to install and use the on board ADC (max1027)
- PWM: how to use the i.MX integrated PWM
- RTC: how to use an external Real Time Clock (Maxim DS1374)
- Watchdog: how to configure and use the i.MX integrated Watchdog
- TV Output: How to use the SVideo output of the APF9328DevFull
Advanced
- BootLoader: (U-Boot useful tips)
- BootStrap: Install an uBoot from scratch or recover your uBoot if it is corrupted