Difference between revisions of "Qt/Embedded"
m (→Installation) |
(move old install) |
||
| Line 9: | Line 9: | ||
==Installation== | ==Installation== | ||
| − | From November 20th 2007, Qtopia is now fully integrated in Armadeus Buildroot. So to install it you have to: | + | From November 20th 2007, Qtopia is now fully integrated in Armadeus Buildroot (old procedure is kept [[QtEmbedded Installation|here]]). So to install it you have to: |
<pre class="host"> | <pre class="host"> | ||
[armadeus]$ make menuconfig | [armadeus]$ make menuconfig | ||
| Line 52: | Line 52: | ||
</pre> | </pre> | ||
| − | |||
| − | |||
| − | |||
| − | |||
| − | |||
| − | |||
| − | |||
| − | |||
| − | |||
| − | |||
| − | |||
| − | |||
| − | |||
| − | |||
| − | |||
| − | |||
| − | |||
| − | |||
| − | |||
| − | |||
| − | |||
| − | |||
| − | |||
| − | |||
| − | |||
| − | |||
| − | |||
| − | |||
| − | |||
| − | |||
| − | |||
| − | |||
| − | |||
| − | |||
| − | |||
| − | |||
| − | |||
| − | |||
| − | |||
| − | |||
| − | |||
| − | |||
| − | |||
| − | |||
| − | |||
| − | |||
| − | |||
| − | |||
| − | |||
| − | |||
| − | |||
| − | |||
| − | |||
| − | |||
| − | |||
| − | |||
| − | |||
| − | |||
| − | |||
| − | |||
| − | |||
| − | |||
| − | |||
| − | |||
| − | |||
| − | |||
| − | |||
| − | |||
| − | |||
| − | |||
| − | |||
== Usage == | == Usage == | ||
Revision as of 13:34, 10 April 2009
Instructions to install and use QtEmbedded & Qt virtual frame buffer for Armadeus
Contents
Introduction
This page will summarize the process to build, install and use Qtopia (previously known as Qt/Embedded).
You will also find instructions to setup a Host development environment for simulating applications before deploying them on the target (Qt virtual frame buffer). The Builroot tree must be installed before the installation of Qt.
Installation
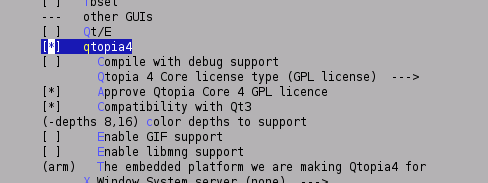
From November 20th 2007, Qtopia is now fully integrated in Armadeus Buildroot (old procedure is kept here). So to install it you have to:
[armadeus]$ make menuconfig
Package Selection for the target  --->
    [*] Graphic libraries and applications (graphic/text)  --->
and then
(don't forget -depths 8,16 option)
- If you want touchscreen support:
    Mouse drivers  --->
        ...
        [*] tslib
then:
[armadeus]$ make
1 hour (depending on your system) and ~1 GBytes later your will have the beast. You can then reflash your rootfs.
Test
If you want to test it, compile and put some examples in your TFTP directory:
 $ cd buildroot/build_armvXX/qt-embedded-linux-opensource-src-4.4.3/examples/widgets/
 $ qmake widgets.pro
 $ make
 ...
 $ cp calculator/calculator /tftpboot
and then launch it on your APF:
 # cd /usr/bin/
 # tftp -g -r calculator 192.168.0.xx (Host IP)
 # chmod a+x calculator
 # export QWS_MOUSE_PROTO="Tslib:/dev/input/event0"
 #
 # calculator -qws
Usage
by default Qt is installed in /usr/lib/ directory of your target rootfs before launching Qt on the target, you should set following env variables to the right value: QTDIR, LD_LIBRARY_PATH, etc... To be completed ......
How to cross-compile an application using Qtopia
The first thing you need to do is to define a specific "qmake specs directory" for armadeus. Here for example:
mkdir $APPLICATION_ROOT_DIR/mkspecs/linux-arm-g++
and install the two following files into this new directory: qmake.conf & qplatformdefs.h. qmake.conf may be customized if necessary.
Then, you must define two typical environment variables :
QTDIR which defines the Qtopia installation path
& QMAKESPEC which defines the path to the configuration files of the qmake tool
Here two typical lines of a Qtopia application building script
export QTDIR=/home/demo/demos/Buitinqt/buildroot/build_armv4t/qtopia-core-opensource-src-4.3.1/
export QMAKESPEC= $APPLICATION_ROOT_DIR/mkspecs/linux-arm-g++
Adapt the QTDIR path to your own installation path and compile your code now, using theses commands:
# build the makefile with the qmake command (See Trolltech documentation for details about qmake):
qmake -spec $QMAKESPEC my.pro
# and now compile the beast... :
make
Good luck....
Work in progress / to do list
-
target installation = integration in Buildroot - examples & demos
- Customization of the Qt libs to have a custom Qt/E library well designed for Armadeus usage.
Links
| Other languages: | |
|---|---|
|
| |
