Difference between revisions of "LinuxInstall"
m (→Configure SDK options) |
m |
||
| Line 23: | Line 23: | ||
<pre class="host"> | <pre class="host"> | ||
sudo apt-get install gcc g++ autoconf automake libtool bison flex gettext | sudo apt-get install gcc g++ autoconf automake libtool bison flex gettext | ||
| − | sudo apt-get install patch subversion texinfo wget | + | sudo apt-get install patch subversion texinfo wget git-core |
sudo apt-get install libncurses5 libncurses5-dev | sudo apt-get install libncurses5 libncurses5-dev | ||
sudo apt-get install zlib1g-dev liblzo2-2 liblzo2-dev | sudo apt-get install zlib1g-dev liblzo2-2 liblzo2-dev | ||
| Line 49: | Line 49: | ||
<pre class="host"> | <pre class="host"> | ||
sudo apt-get install gcc gcc-c++ autoconf automake libtool bison flex gettext | sudo apt-get install gcc gcc-c++ autoconf automake libtool bison flex gettext | ||
| − | sudo apt-get install patch subversion texinfo wget | + | sudo apt-get install patch subversion texinfo wget git |
sudo apt-get install libncurses5 libncurses-devel | sudo apt-get install libncurses5 libncurses-devel | ||
sudo apt-get install zlib1-devel liblzo2_2 liblzo-devel | sudo apt-get install zlib1-devel liblzo2_2 liblzo-devel | ||
| Line 64: | Line 64: | ||
<pre class="host"> | <pre class="host"> | ||
yum install gcc gcc-c++ autoconf automake libtool bison flex gettext | yum install gcc gcc-c++ autoconf automake libtool bison flex gettext | ||
| − | yum install patch subversion texinfo | + | yum install patch subversion texinfo git |
yum install zlib-devel gettext-devel ncurses-devel lzo-devel libacl-devel | yum install zlib-devel gettext-devel ncurses-devel lzo-devel libacl-devel | ||
</pre> | </pre> | ||
Revision as of 22:16, 30 June 2009
How-To install Armadeus Software Development Kit (SDK) on Linux systems.
The installation was successfully tested on the following distributions:
- Debian Sarge, Etch & Lenny
- Fedora Core 3 & 4
- Fedora 10
- KUbuntu Edgy Eft (6.10), Gusty Gibbon (7.10), Hardy Heron (8.04) & Jaunty Jackalope (9.04)
- Mandriva 2006
- SuSE 10.1
- Ubuntu Dapper Drake (6.04) & Intrepid Ibex (8.10)
- Xubuntu Edgy Eft (6.10)
Contents
Prerequisites for Linux installation
Depending on your distribution, some additional packages are required.
Debian/Ubuntu based systems
- you can use the following command to get them (assuming your userid is allowed to use sudo (execution of commands as root)):
 sudo apt-get install gcc  g++ autoconf  automake libtool bison flex gettext
 sudo apt-get install patch  subversion texinfo wget git-core
 sudo apt-get install libncurses5 libncurses5-dev
 sudo apt-get install zlib1g-dev liblzo2-2 liblzo2-dev
 sudo apt-get install libacl1 libacl1-dev
Not mandatory but useful to add for compiling some Buildroot packages:
 sudo apt-get install libglib2.0-dev
 sudo apt-get install libnetpbm10-dev   (for fbtest)
Mandriva based systems
- name of packages are different therefore use the lines hereafter instead (assuming sudo is configured to support root commands):
 sudo apt-get install gcc  gcc-c++ autoconf  automake libtool bison flex gettext
 sudo apt-get install patch  subversion texinfo wget git
 sudo apt-get install libncurses5 libncurses-devel
 sudo apt-get install zlib1-devel liblzo2_2 liblzo-devel
 sudo apt-get install libacl1 libacl-devel
Not mandatory but useful to add some Buildroot packages:
sudo apt-get install libglib2.0-devel
RPM-based systems
- like Fedora and CentOS, the following commands should install all the needed prerequisites (assuming root shell):
 yum install gcc gcc-c++ autoconf automake libtool bison flex gettext
 yum install patch subversion texinfo git
 yum install zlib-devel gettext-devel ncurses-devel lzo-devel libacl-devel
Not mandatory but useful to add some extra packages:
yum install glib2-devel lzo2-devel
Get Armadeus software
- If you are a "careful" user, then download the latest stable installation tarball from SourceForge and detar it wherever you want:
$ tar xjvf armadeus-3.1.tar.bz2
- If you are upgrading from armadeus-2.x, then take a look at this page
- If you are a hacker or a registered developer, check out the latest development revision from the SVN repository:
$ svn co https://armadeus.svn.sourceforge.net/svnroot/armadeus/trunk armadeus
- you can also check it out from the new GIT repository:
$ git clone git://armadeus.git.sourceforge.net/gitroot/armadeus armadeus
A directory named armadeus/ or armadeus-3.1/ will be created on your hard-disk and will contain all the files you need.
Remarks:
- Do not use spaces in the directory name !
- SVN write/commit accesses are limited to the integrators (JulienB, Salocin68, Jorasse, FabienM)
Configure SDK options
The first time you compile an Armadeus distribution you have to specify the target to work with.
 $ cd armadeus/  (or armadeus-3.1/)
 $ make apf9328_defconfig
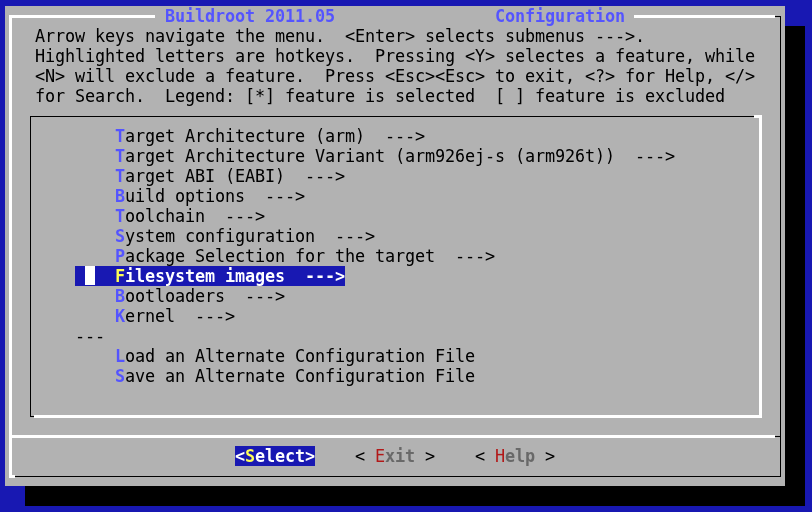
This command reloads the default configuration to support an APF9328 board and automatically start a Buildroot's configuration menu. For the APF27 it would be:
$ make apf27_defconfig
| |
Note: If you made changes in the next step, at any time you can reload the default configuration with make apf9328_defconfig or make apf27_defconfig. |
- If you are not familiar with Buildroot here are some tips:
- you can move the highlighted item with the "up"/"down" arrow keys
- with the "left"/"right" arrow keys you can choose between "Select", "Exit" or "Help" buttons
- "space"/"enter":
- selects the currently highlighted item if you are on the "Select" button
- go back in previous menu if you are on "Exit" button
- show you some Help for current item if you are on "Help" button
- for more Help about Buildroot commands, select "Help" in the main configuration screen
- In menu:
Target options  --->
    [*] Armadeus Device Support  --->
you can check and change the quantity of RAM available on your Armadeus board. Default value 16MB is just fine with all APF9328 boards, for APF27 it could be either 64MB or or 2 x 64MB (in that case be sure to select 2 chips of 64MB instead of 1 chip of 128MB).
- In menu:
Target filesystem options -->
for each type of filesystems to build, you have the option (also copy the image to...) to copy the binary file to secondary location like your tftp server folder (for example /tftpboot).</b>
- In menu:
Target filesystem options -->
you will find U-Boot options (at the end), including the one to copy it to a secondary location (like /tftpboot)
- In menu:
Kernel -->
    Destination for linux kernel binaries -->
you will find options to copy Linux to a secondary location (like /tftpboot)
- You may decrease the compilation time by increasing the number of parallel jobs running simultaneously on your system (the result is not guaranteed). This option is located in
Build Options --->
    (1) Number of jobs to run simultaneously
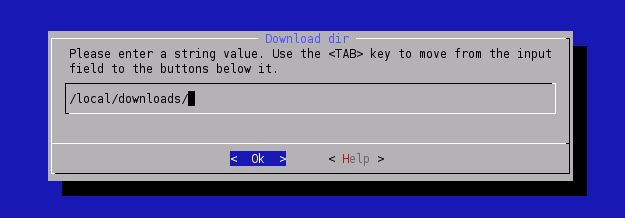
- During the toolchain/distribution automatic build, a lot of software archives are downloaded from Internet. The downloaded files are put by default in the armadeus/downloads/ directory. If you have several views or plan to build the toolchain several times, we advise you to put all the downloaded files in /local/downloads (for example). This is done by configuring Buildroot to use this directory for all your views:
Build options  --->
    (...) Download dir
- After the build, we advise you too to copy all the files in downloads/ on a removable medium, in case you want to install the development tools on several systems.
- Now, Exit the configuration tool and save your configuration
Launch build
$ make
The toolchain and the full distribution are automatically built. During this procedure, several files are downloaded from Internet.
Please wait for a while.... it takes at least one hour for the first run!
The downloaded files are put (by default) in the armadeus/downloads/ directory. Please see the previous chapter to know how to optimize that if you plan to build several views.
Enjoy the result
The generated binary files can be found in the subdirectory buildroot/binaries/apfXX/ (where XX is the name of your board):
- apfXX-u-boot.brec: only on APF9328; BRecord image that can be used with the bootstrap, if U-Boot is not installed or not working (see BootLoader page)
- apfXX-u-boot.bin: U-Boot image file to be used with U-Boot itself, (see updating U-Boot)
- apfXX-linux.bin: Linux image to use with U-Boot, (see updating Linux)
- apfXX-rootfs.arm.jffs2: filesystem/rootfs image to use with U-Boot, (see updating rootfs)
- apfXX-rootfs.arm.tar: for an NFS/MMC based rootfs, (see Booting from NFS & Booting from a MMC/SD)
Please note the new naming convention of binary files and directories
The toolchain and project files share a new naming convention too (YY is 4t for APF9328 and 5te for APF27):
- buildroot/build_armvYY: contains all non configurable user-space tools
- buildroot/project_build_armvYY/apfXX: contains all configurable user-space tools: target filesystem, linux, busybox and u-boot...
- buildroot/toolchain_build_armvYY: cross compilation toolchain
More information is available in the buildroot documentation
- Note: Previous versions of Armadeus SDK stored the generated binary files at different place buildroot/binaries/armadeus/ and file names did not contained any prefix of board name:
- u-boot.brec (BRecord image that can be used with the bootstrap, if U-Boot is not installed or not working)
- u-boot.bin (U-Boot image file for use with U-Boot itself)
- linux-kernel-2.6.xx-arm.bin (Linux image to use with U-Boot)
- rootfs.arm.jffs2 (FileSystem/RootFS image to use with U-Boot)
- rootfs.arm.tar (for an NFS/MMC RootFS)
To keep your copy up-to-date with the armadeus SVN repository
$ svn update
This will update your working directory to the latest release.
Note: if "svn update" fails because a directory or a file already exists, then do:
$ rm -rf <this-directory/file>
$ svn update
You can do a:
$ make apf9328_defconfig
to have the latest features automatically activated and a
You have to do a make to rebuild binary files and then upload the binary files to your target.
Note: if definitively everything goes wrong while it worked before the last update. You can apply the following procedure (all your modifications in buildroot will be lost):
$ rm -rf buildroot/
$ rm Makefile
$ svn update
$ make apf9328_defconfig
$ make
Enjoy!
| Other languages: | |
|---|---|
|
| |


