MotionSystem
Contents
Project Description
The application field of this project is robotic.
The goal of this project is to provide a R/C Servos Controller to manage R/C by different ways, and a motion measurement system via accelerometers.
The project is composed by different componants:
- A hardware board on which are plugged R/C servos, accelerometers and ADC multiplexers.
- A FPGA firmware which manages R/C servo at low level (Already written, thanks to Sonzerro and Fabien Marteau).
- A Linux Kernel Driver which manages the FPGA Firware, the ADC multiplexers and ADC Max1027.
- A user space daemon which manages the driver and listen on TCP port to accept remote commands from the network.
- A user desktop application which sends commands to the daemon.
Texte italique
Participating Armadeus members
- Yvan ROCH
Project data
Introduction
Overall original objectives of the project have not been reached. The following functionality are not implemented:
- The accelerometers and ADC multiplexers are under development (hardware, driver and user application).
- The board is available in schematic form. No PCB layout.
The following functionality are implemented:
- A FPGA firmware which manages R/C servo at low level.
- A Linux Kernel Driver which manages the FPGA Firware.
- A user space daemon which manages the driver and listen on TCP port to accept remote commands from the network.
- A user desktop application which sends commands to the daemon.
Project Files
All the necessary files are available in an archive under the following URL: Project Files
- Hardware Interface Board
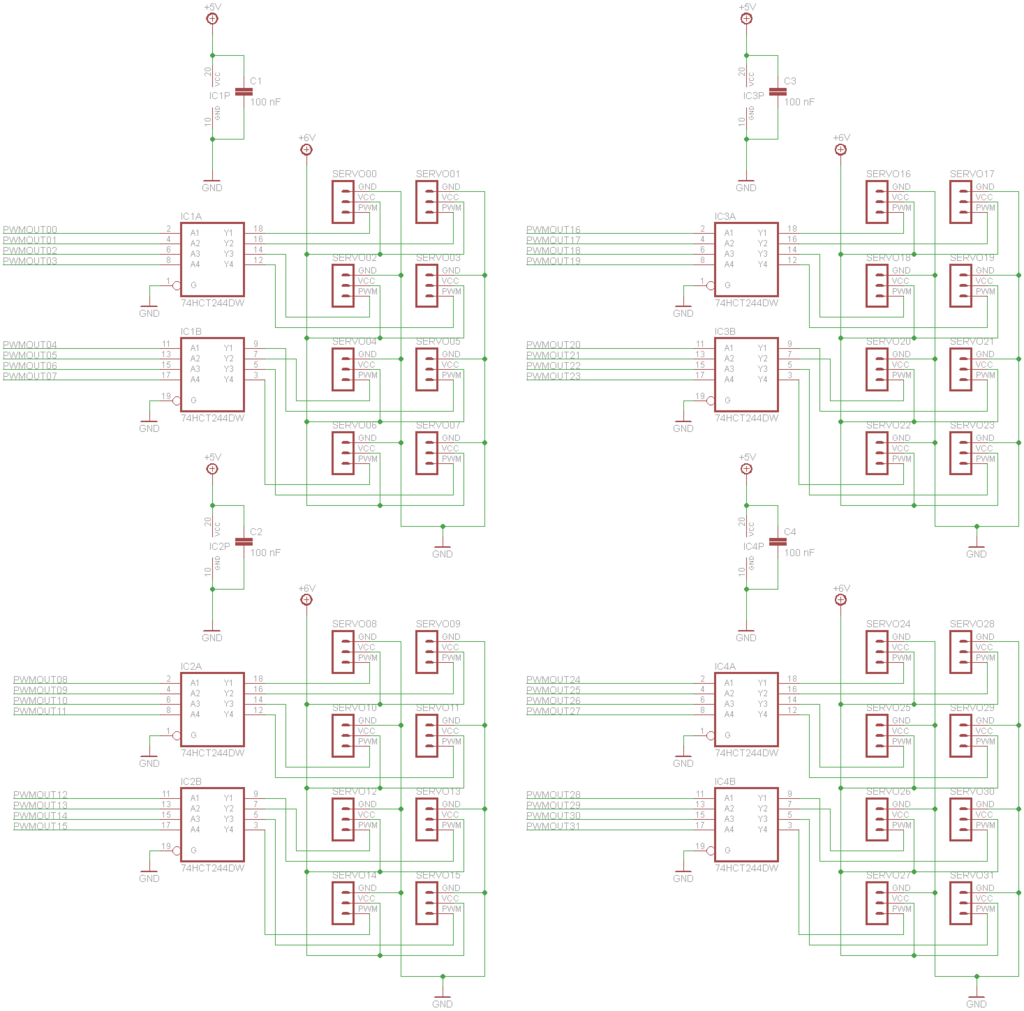
The board contains the logic and voltage level adaptation to drive the R/C servos. As already said, the is no PCB layout.
The schematic is available in the file...
The schematic was design with Eagle available at the following URL: Eagle
- FPGA Firmware
- Linux Kernel Driver
- User Space Daemon
- User GUI Application
How to use the project
Introduction
The main goal of this project is to develop a system to manage motion on robotic platform. Finally only the subsystem that manages R/C servos is achieved. The MotionSystem can manage up to 32 R/C servos. R/C servos are a good solution to the moving issue on a small robotic platform. Hobbyist robotic platform like Lynxmotion Robots (http://www.lynxmotion.com) use many R/C servos.
R/C Servo
A description (in French) of such R/C servo can be found at http://fribotte.free.fr. R/C servo needs a pulse-width modulated (PWM) signal to manage his angular position. This signal looks like this:
Basically, it is possible to generate this signal with a GPIO pin controlled by Linux kernel code. But this solution has three major drawbacks:
- The true concurrency is impossible, R/C servo signal are not synchronous
- The delays of PWM signal (between 0.5 ms and 2.5 ms) are mandatory implemented with busy waiting (udelay Linux kernel function) to give the necessary accuracy. It is very processor time consuming.
- Due to the intrinsic non real time characteristic of the Linux kernel, the accuracy of the delays are impassible on a heavy loaded system. This causes R/C servo jittering (When a R/C servo jitters, it seems to have Parkinson's disease... Jitter
For these reasons, the subsystem that generates PWM signals is implemented in the FPGA. In a FPGA, true concurrency is feasible, no processor time is used and timings are very strict.
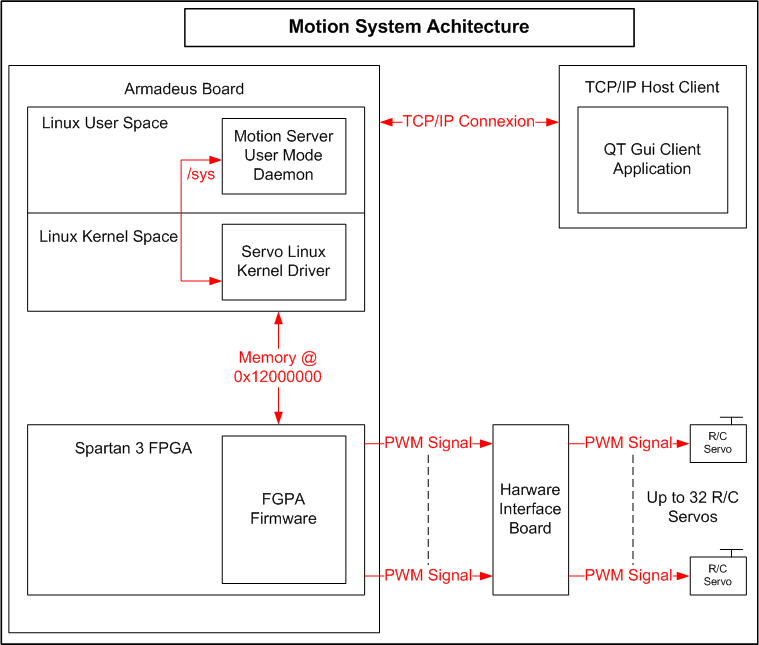
MotionSystem Architecture
The MotionSystem architecture is describe in the following diagram:
Hardware Interface Board
The schematic diagram of the interface board is located in the hardwareInterfaceBoard directory of the main archive file of the project (see above). The design is very simple for this version without R/C servo strength control and accelerometers. It is mainly composed of buffers between FPGA output and R/C servo input. The following diagram is an export of the original Eagle file of the main archive:
How to connect the hardware interface board to the Armadeus APF9328DevLight board
The following table establish the connexion between the interface board and the Armadeus APF9328DevLight board. The pinout of the Armadeus APF9328DevLight board is available at APF9328DevLight. Please refer to the official documentation for other boards.
| Signal on the diagram | APF9328DevLight pin | Spartan 3 pin |
| pwmOut00 | L24N_3 | P87 |
| pwmOut01 | L24P_3 | P86 |
| pwmOut02 | L23N_3 | P85 |
| pwmOut03 | L40P_2 | P92 |
| pwmOut04 | L40N_3 | P90 |
| pwmOut05 | L40P_3 | P89 |
| pwmOut06 | L24N_2 | P96 |
| pwmOut07 | L24P_2 | P95 |
| pwmOut08 | L40N_2 | P93 |
| pwmOut09 | L22P_2 | P99 |
| pwmOut10 | L23N_2 | P98 |
| pwmOut11 | L23P_2 | P97 |
| pwmOut12 | L21N_2 | P103 |
| pwmOut13 | L21P_2 | P102 |
| pwmOut14 | L22N_2 | P100 |
| pwmOut15 | L01P_2 | P107 |
| pwmOut16 | L20N_2 | P105 |
| pwmOut17 | L20P_2 | P104 |
| pwmOut18 | L32N_0 | P128 |
| pwmOut19 | L32P_0 | P127 |
| pwmOut20 | L01N_2 | P108 |
| pwmOut21 | L31P_0 | P129 |
| pwmOut22 | L31N_0 | P130 |
| pwmOut23 | L32N_1 | P125 |
| pwmOut24 | L30P_0 | P131 |
| pwmOut25 | L30N_0 | P132 |
| pwmOut26 | L27P_0 | P135 |
| pwmOut27 | L28N_1 | P119 |
| pwmOut28 | L28P_1 | P118 |
| pwmOut29 | IO1 | P116 |
| pwmOut30 | L01P_1 | P112 |
| pwmOut31 | L01N_1 | P113 |
FPGA Firmware
For basics about FPGA on Armadeus board, please consult FPGA.
The FPGA firmware is located in the fpgaFirmware directory of the main archive file of the project (see above). The following files form the FPGA firmware:
SERVO_top.vhd: This is the main module.
COUNTER.vhd: This module is a 16 bits counter at 4 MHz used by all the PWM modules.
RESET_MODULE.vhd: This module is a cold start reset generator.
pwm_module.vhd: This module generates the PWM output.
servo.ucf: Signals/pins mapping file.
How to build the FPGA Firmware:
The Xilinx ISE® WebPACK™ design software is used to build the FPGA firmware.
- 1 - Create a new project for the Spartan 3
- File->New Project
- Select Top Level Source: HDL (Hardware Description Language)
- For the Armadeus FPGA choose:
- Family: Spartan3
- Device: XC3S200
- Package: TQ144
- Speed: -4
- Top Level Source: HDL
- Synthesis Tool: XST
- Simulator: ISE Simulator (VHDL/Verilog)
- Preferred Language: VHDL
- 2 - Import the source files in the project
- Project->Add Source
- Select files:
- SERVO_top.vhd
- COUNTER.vhd
- RESET_MODULE.vhd
- pwm_module.vhd
- servo.ucf
- 3 - Synthesize SERVO_top.bit firmware binary file
- Generate Programming File->right click->Run
- You get a SERVO_top.bit in the ISE project directory.
How to load SERVO_top.bit firmware binary file in the Spartan 3
You need a connexion with the Armadeus board, RS323 or TFTP. For basics about communication with the Armadeus board, please consult Connection_with_U-Boot_on_Linux. The RS232 method is describe here but the TFTP transfer is possible and faster.
- Install and configure Kermit like describe in Kermit.
- Launch Kermit.
- Power up the Armadeus board.
- Hit any key to stop auto boot and to obtain the command prompt:
BIOS>
- Choose the upload memory address:
loadb 08000000
- The Armadeus board is ready to receive file:
## Ready for binary (kermit) download to 0x08000000 at 115200 bps...
- Change to the Kermit command mode:
Ctrl+Altgr+\+c
- File upload:
send SERVO_top.bit
- Kermit upload the file. After uploading, Kermit says:
Hit c to reconnect the terminal.
- Firmware Flashing:
run flash_firmware
- Loading the firmware in the FPGA:
fpga load 0 ${firmware_addr} ${firmware_len}
- For an automatic loading at boot:
setenv firmware_autoload 1
saveenv
- The firmware is now usable!!!
How to test the FPGA firmware
The FPGA firmware is not design to be used with U-Boot command. In the final configuration, firmware is managed by the Servo Linux Kernel Driver. However, it is possible to send command to the firmware with U-Boot command and show the result. It is not very "Pretty User", but it is enough to validate the good working order of the firmware. First, you must build hardware interface board as describe in section Hardware Interface Board and connect R/C servos to the interface.
Linux Kernel Servo Driver
The Linux kernel driver is located in the ArmadeusServoDriver directory of the main archive file of the project (see above). The following files form the Linux kernel driver:
servo.c: Main file.
servo.h: Header file.
Makefile: Kernel module makefile.
Kconfig: Kernel configuration file.
How to build and install the Linux Kernel Servo Driver:
Before building the servo driver, be sure that the Toolchain and the Linux Kernel build system work fine on your host system. In the following, $ARMADEUS_ROOT will refer to the root directory of Armadeus SDK (for example: /usr/local/src/armadeus3-trunk)
export ARMADEUS_ROOT=/usr/local/src/armadeus3-trunk
Create a symbolic link in the FPGA driver directory of the Armadeus SDK to the ArmadeusServoDriver directory:
ln -s ~/ArmadeusServoDriver $ARMADEUS_ROOT/target/linux/modules/fpga/
Reference the new directory in the file $ARMADEUS_ROOT/target/linux/modules/fpga/Makefile by replacing:
obj-$(CONFIG_ARMADEUS_FPGA_DRIVERS) += dev_tools/ others/ POD/ wishbone_example/
by
obj-$(CONFIG_ARMADEUS_FPGA_DRIVERS) += dev_tools/ others/ POD/ wishbone_example/ ArmadeusServoDriver/
Reference the new directory in the file $ARMADEUS_ROOT//target/linux/modules/fpga/Kconfig by adding:
source "drivers/armadeus/fpga/ArmadeusServoDriver/Kconfig"
Configure the Linux kernel to build the servo module:
cd $ARMADEUS_ROOT
make linux26-menuconfig
In Device Drivers ---> Armadeus specific drivers ---> FPGA Drivers, select Armadeus Servo driver (NEW) as module. Rebuild the new Linux kernel and modules:
make clean
make
The module servo.ko is now in target root filesystem and in the ArmadeusServoDriver directory. Install your new Linux Kernel and your root filesystem as describe in Target_Software_Installation
How to test the Linux Kernel Servo Driver
Linux Kernel Servo Driver is not design to be used with shell command. In the final configuration, the driver is managed by the User Space Daemon. However, it is possible to send command to the driver via writing in the /sys filesystem. It is not very "Pretty User", but it is enough to validate the good working order of the driver. First, you must build and load the Servo FPGA Firmware.
User Space Daemon
User GUI Application
The User GUI Application is an client example of the Servo User Space Daemon. This application is based on [1]


