Communicate
How-To connect your Armadeus board to your development Host.
Contents
Forewords
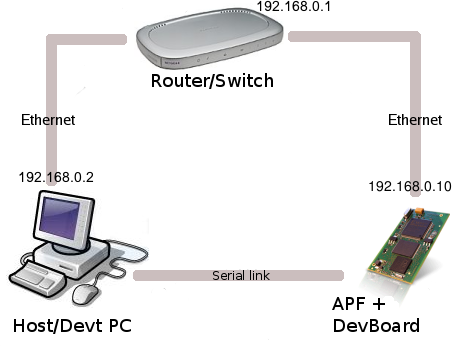
The default connection uses a simple Serial Link either with a RS232 Null-Modem cable (with or without USB<->serial adapter) or with a miniUSB cable (APF51 / APF28 / APF6).
As you will have to transfer some MBytes of data, the Ethernet link is nice to have, if not mandatory.
In order to use these two ways of transfer with the APF target, a terminal emulator (for Serial link) and a TFTP server (for Ethernet link) have to be configured.
At this stage, you should have something looking like that (IP addresses may change):

Serial Terminal configuration
You will need a Serial terminal emulator to communicate with U-Boot/Linux console. You can choose between:
We suggest you to use Kermit as Terminal emulator. Minicom was sadly reported to have problems when communicating with U-Boot (ZModem data transfer). If you just need a simple serial console and not to transfer data through the serial link, then GTKTerm is the perfect choice ! (gtkterm package in Ubuntu)
TFTP server
In order to send your image files (U-Boot, Linux, rootfs or FPGA's firmware) at higher speed (than serial port) to your Armadeus board, you can use the Ethernet link and a TFTP server. Once the server configured, the files located in the server shared directory (/tftpboot by default) will be accessible from the U-Boot/Linux TFTP clients.
TFTP server installation
Install packages
* On *Ubuntu / Debian:
$ sudo apt-get install tftpd xinetd or use your preferred graphical package manager |
* On Fedora:
$ rpm -q tftpd xinetd |
* On OpenSUSE 11.3:
sudo zypper install tftp yast2-tftp-server
sudo yast2 tftp-server
Choose Enable to start the TFTP server. It might be required to open the TFTP port in your firewall. For more details see: YaST TFTP Server on OpenSUSE site |
Create server's directory
- Then create the directory (/tftpboot/) that will contain all the files that the server will export:
$ sudo mkdir /tftpboot
$ sudo chmod 777 /tftpboot
Server configuration
- As root user edit or create the /etc/xinetd.d/tftp configuration file and modify/add it the following lines:
# default: off
# description: The tftp server serves files using the trivial file transfer
#       protocol.  The tftp protocol is often used to boot diskless
#       workstations, download configuration files to network-aware printers,
#       and to start the installation process for some operating systems.
service tftp
{
       socket_type             = dgram
       protocol                = udp
       wait                    = yes
       user                    = root
       server                  = /usr/sbin/in.tftpd
       server_args             = -s /tftpboot
#       disable                 = yes
}
- Restart xinetd service:
$ sudo killall -HUP xinetd
For more information regarding how-to setup a TFTP server please check one of many Web How-to:
- Another how-to configure a TFTP Server for Linux
- till another how-to...
- ubuntu TFTP server documentation in French
Troubleshooting
Timeout in U-Boot
- On recent Debian distribution (sid?), it seems that installing ckermit package may switch inetd server from xinetd to openbsd-inetd. If you fall in that case, then you have to configure /etc/inetd.conf by adding the following line:
tftp dgram udp wait nobody /usr/sbin/tcpd /usr/sbin/in.tftpd -s /tftpboot
- Then restart inetd:
/etc/init.d/openbsd-inetd restart
Connection refused
It looks like xinetd configuration is not sufficient in some recent versions of this tool. IPv6 is enabled by default and seems to be not compatible with the TFTP protocol. A simple inetd configuration should work for people who have this problem (connection refused in system logs with addresses like ::ffff:192.168.0.100).
- Edit (as root user) - if necessary - the /etc/inetd.conf file and add this line:
tftp dgram udp wait nobody /usr/sbin/tcpd /usr/sbin/in.tftpd -s /tftpboot
- Install inetd tools
On Ubuntu/Debian
$ sudo apt-get install inetutils-tools
- Setup the hosts rules: edit (as root user) /etc/hosts.allow and add the following lines:
in.tftpd: ALL
tftpd: ALL
- Restart inetd
$ /etc/init.d/openbsd-inetd restart
It's done... and should work for most people.